
Tarp Shelter Guide – Build Smart, Stay Dry
As someone who spends weeks on trails each year, I’ve learned that thru-hikers and minimalist explorers value one thing above all: simplicity. Swapping bulky tents for tarps changed the game for me. These ultralight shelters take up almost no space in your pack, yet they’re tough enough for harsh conditions. Many backpackers prefer tarp setups because they offer flexibility in the wild—you can pitch them almost anywhere, and the weight savings are huge on long backpacking trips.
Forget the bulky blue sheets you find at a hardware store. Modern traps are made of nylon or polyester, materials that are strong, thin, and either fully waterproof or impressively water resistant. These aren’t just emergency covers, they’re thoughtfully designed systems that protect you without weighing you down. A quality tarp shelter feels like an upgrade, not a compromise.
Built-In Features That Make a Difference
After countless nights under open skies, I’ve come to rely on a tarp not just for weight savings, but for smart, built-in design. Good tarp shelters aren’t just fabric—they’re purpose-built for quick setup and reliable protection. Whether you’re camping in a forest or on an open ridgeline, small details can make a big difference. One windy night in the Rockies, the reinforced loops and sturdy grommets on my shelter kept everything secure while others scrambled with failing gear. The smart placement of each feature is what truly sets a dependable tarp apart.
Here are the features I’ve come to trust:
- Grommets for pole tips at the middle of each side
- Sturdy and reinforced loops at the corners and edges for stake points
- Multiple places to attach guylines, whether to objects or trees
- Extra loops for more guy lines in strong winds
- Loops on the centerline and top for adding a ridgeline or central setup
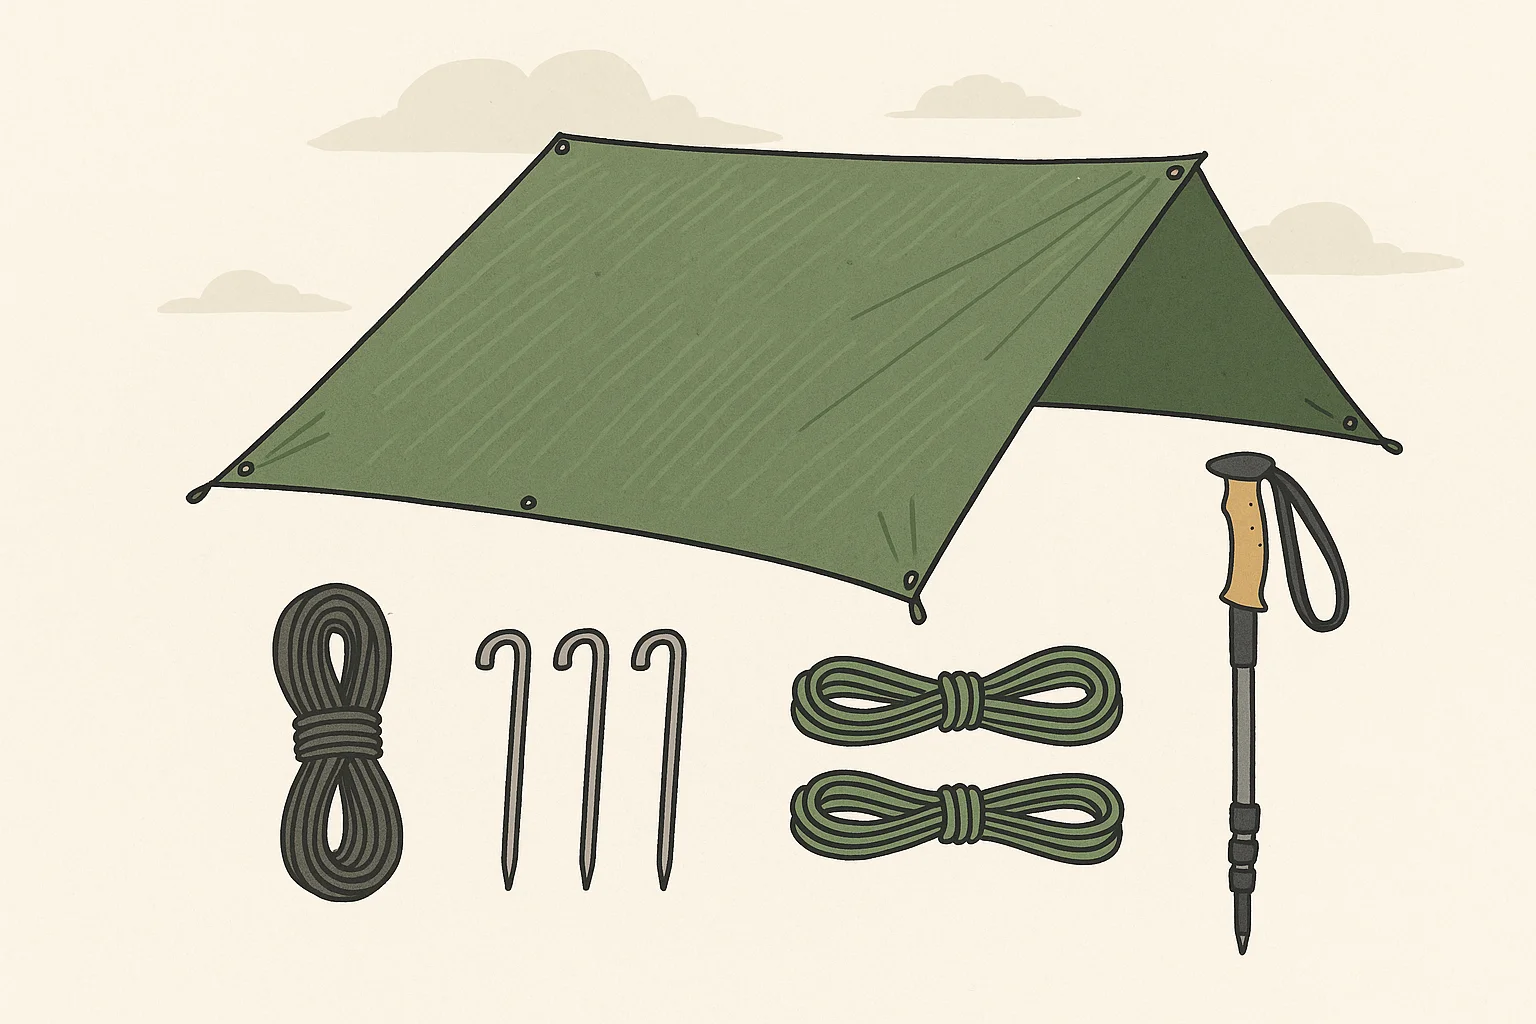
Tarp Shelter Setup Supplies
The Tarp Itself: When choosing tarps for backpacking, the first thing I look at is the shape and size. Many are square, which makes them perfect for the common setups I use out in the backcountry. You’ll find a wide range of sizes and shapes, but I often go with something in the 9’ x 9’ size—it gives great coverage without adding bulk. Most of these tarps weigh about 1 pound, which keeps my load light and efficient, whether I’m camping solo or using it as part of a bigger shelter system.
Guidelines and Setup Tips: When I first started using tarp shelters, I was surprised by how much a simple cord and a well-tied knot could change everything. While many guylines come pre-attached to the tarp, some have helpful extras like tensioners or even cleats to make the setup smoother. These little details add a lot of ease when pitching in rough weather or fading light. Still, nothing replaces solid knowledge—understanding your gear and mastering the basics can make even the simplest tarp feel like a secure home.
Extra Cord Options: Bringing some extra lines has saved my setup more than once, especially when I’ve needed to extend my guylines or quickly create a stable ridgeline in tricky spots. In windy conditions or uneven ground, having a few extra feet of cord can give you more options and flexibility. Even if it’s not included with the tarp, I always pack some, because the right adjustment at the right moment can be the difference between a solid shelter and a restless night.
Reliable Stakes Matter: While many shelters include basic stakes, I always pack an extra stake or two just in case. It’s a simple habit that’s helped me countless times, especially when I needed more setup flexibility or accidentally managed to lose or even break one on rocky ground. Having backup gives you more options, whether you’re dealing with tricky terrain or high winds. It’s one of those small things that make a big difference in keeping your tarp shelter secure and stress-free.
Pole Choices and Setup Flexibility: Many shelters are designed to be used with trekking poles, which is perfect for hikers already carrying them. I’ve found this setup incredibly practical—it saves weight and reduces extra gear. While shelter poles are sometimes included, most tarp shelters assume you’ll bring your own. If you don’t hike with trekking poles, make sure to plan with dedicated poles that match your tarp’s height and design.
Three Knots to Know:
Learning just three simple knots can change how fast and solid your tarp setup is, even if tying anything beyond your shoelaces feels like a challenge. Over time, I’ve built up my skills with different knots, but I always come back to these basics: The bowline for making secure loops, The trucker’s hitch for tightening cord, and the prusik for adjustable tension. This range covers everything I need, and mastering it took less time than I expected. If you put in a little learning early on, you’ll feel confident anytime you pitch your tarp.
A-Frame Setup
The classic A-frame is one of my favorite ways to pitch a tarp because it’s quick, solid, and offers just enough space for two people to sleep comfortably while staying off the ground. I’ve used this setup in forests, alpine zones, and windy hillsides—it’s reliable across conditions. The key is getting the right tension on your guylines and making sure the corners and sides are well staked and secure. Adjusting headroom by lengthening or shortening your trekking poles also gives better comfort. For more ventilation, you can raise the shelter a few inches and guy out the loops wider to keep it taut.
Steps:
- Stake down the corners along one edge of the tarp.
- Place trekking poles midway on the front and back edges, slightly angled.
- Lightly tension and stake the guylines to hold the poles in place.
- Stake down the opposite corners and then tighten the guylines further.
- Add more stakes to loops on the sides as needed to secure the shelter.
- Adjust headroom by repositioning, lengthening, or shortening the poles.
- For airflow, raise the corners and sides a few inches, and retensioning the guylines can help fine-tune the setup.
Setting Up a Ridgeline for Your Shelter
If you’re not carrying trekking poles and your camp spot has trees, setting up a ridgeline is a great alternative to pitching an A-frame shelter. I’ve often used this method on wooded trails—it’s fast, stable, and works well for many setups. You’ll need a strong cord, and you’ll be working along the centerline of your tarp, either through the top loops or underneath, depending on the tarp’s design. With a little tension and the right knot, your shelter will stay taut and secure even in rough weather.
Steps:
- Run a cord along the centerline of the tarp, through the top loops, or underneath its length.
- Tie a bowline knot around one tree to anchor the line.
- Use a trucker’s hitch on the opposite tree to tighten the ridgeline.
- Attach a prusik knot through the front grommet, wrap it around the ridgeline, and repeat at the rear.
- Slide the prusik knots until the tarp is taut across the line.
- Stake out the corners and sides to finish tensioning the shelter.
Closed-End A-Frame Setup
When you need more protection from wind and rain, the closed-end A-frame is a smart alternative to the classic setup. I’ve used this style on nights when strong gusts would’ve blown straight through an open design. By sealing the back and pitching the shelter low to the side facing the elements, you stop cold air and water from getting in. The setup is still simple, and you can adjust the headroom as needed by lengthening, shortening, or repositioning your trekking pole at the front.
Steps:
- Stake the middle point at the back of the shelter.
- Place the trekking pole at the front, slightly angled.
- Lightly apply tension on the Guylaine to hold the pole steady.
- Stake in both front corners.
- Then stake the back corners.
Wind-Shed Setup
If you’re backpacking in a warm area and want both protection from the wind and a good view—maybe of a nearby lake or mountain—the wind-shed setup is a perfect choice. I’ve used it when the direction of the wind was steady, and I wanted more openness on one side of the shelter. With a few tweaks to your guyline angles and tension, this tarp pitch offers good tautness while keeping one corner elevated for airflow and scenery. And if there’s a tree nearby, you can even use it as a smart guy-out point for that high corner.
Steps:
- Stake down one side of the tarp.
- Place a trekking pole (slightly angled) in the middle of an adjacent side and tension its guyline at a 90° angle.
- Set the other trekking pole (also angled slightly toward the front) in the middle of the opposite side and lightly tension that guyline.
- Stake the nearby corner, then stake the rest of that side.
- Add a short guyline to the final corner, then stake and adjust the line for proper angles and tautness.
C-Fly Setup
The C-fly is one of my favorite shelter styles when I want great views and good protection from wind coming from a specific direction. It also comes with the bonus of acting like a ground sheet, helping keep your sleeping setup dry even on soggy soil. This setup is ideal for warm weather, and although it requires a few more stakes than other styles, the result is a secure, open-front shelter that feels both stable and spacious. With the smart use of guyline tension and pole placement, the design remains taut and maintains its shape well.
Steps:
- Stake the corners of the rectangular section that will act as your ground sheet.
- Place one trekking pole to support one side of the ridgeline, then add a guyline from the front of the tarp at a 90° angle and stake it down with light tension.
- Repeat this with the second trekking pole on the opposite side of the ridgeline.
- Retension both guylines and adjust the angle to keep the shelter taut.
- For more stability, add a guyline from the top of each pole, extending at a 90° angle from each side.
Frequently Asked Questions – Tarp Shelter
1. What is a tarp shelter, and why should I use one instead of a tent?
A tarp shelter is a lightweight and versatile shelter made from waterproof or water-resistant fabric, often set up with trekking poles, guylines, or trees. It’s ideal for backpacking and minimalist camping because it’s much lighter than a tent, packs smaller, and gives more setup flexibility.
2. How do I choose the right size tarp for my needs?
A common size like 9′ x 9′ works well for solo hikers or two people. If you want extra space, protection from wind or rain, or a ground sheet, consider larger sizes or shapes based on your preferred setup, like an A-frame or C-fly.
3. Do I need special equipment to pitch a tarp shelter?
You’ll need stakes, cord, and either trekking poles or access to trees for support. Knowing a few basic knots like the bowline, prusik, and trucker’s hitch will make setup easier and more secure.
4. Will a tarp shelter keep me dry in bad weather?
Yes—if set up correctly. Using angled sides, tight guylines, and proper tension helps keep the shelter taut and sheds water effectively. Some configurations, like the closed-end A-frame or wind shed, are better for stormy conditions.
5. Can I use a tarp shelter in cold weather?
While tarp shelters aren’t insulated like tents, they can still be used in cold weather with a smart setup, proper wind protection, and a warm sleeping system. Keep low to the ground, close corners, and limit open exposure when conditions are harsh.
Conclusion
A tarp shelter is more than just a piece of gear—it’s a skillful, adaptable solution for anyone who values simplicity, lightweight travel, and connection with the outdoors. Whether you’re a seasoned backpacker or just starting to explore minimalist camping, learning how to use different setups like the A-frame, C-fly, or wind shed gives you the freedom to handle changing weather and terrain with confidence. With the right tarp, a few essential tools, and knowledge of knots, you can create a shelter that’s not only functional but also deeply rewarding to build.
Hi! This is my first visit to your blog! We are a collection of volunteers and starting a new project in a community in the same niche. Your blog provided us valuable information to work on. You have done a wonderful job!
Thanx for the effort, keep up the good work Great work, I am going to start a small Blog Engine course work using your site I hope you enjoy blogging with the popular BlogEngine.net.Thethoughts you express are really awesome. Hope you will right some more posts.
I am continuously invstigating online for posts that can help me. Thank you!
Valuable information. Lucky me I found your site by accident, and I’m shocked why this accident didn’t happened earlier! I bookmarked it.
This actually answered my problem, thanks!