
Tarping Camping Tips – Master the Wild Shelter
Having spent years honing my Tarp camping skill, I can tell you that one of the biggest benefits is how it offers a lightening effect on your pack compared to lugging around a tent. When I first started getting into this hobby, I had to learn a range of tricks to work with cordage and other materials to construct a shelter, and through trial and error, I came to know the subtle art of balancing lightweight gear with comfort. Any savvy outdoorsman will appreciate that this style of camping draws on bushcraft instincts, from building your setup to managing survival needs in challenging outdoor conditions; at times, I’d find myself improvising with simple tarps and a single tarp to create a refuge that rivals more traditional setups.
On a recent trek, I stood at a trailside campsite and watched a trend unfold as ultralight backpackers, fastpacker,s and the fast and light crowd ditched bulky tents for tarps; the appeal was obvious because the setups are far lighter, making the heaviest gear feel manageable even when someone in the group was hauling 15 kilograms of supplies. I’ve met kayakers, bikepackers, fishermen, and scout groups all experimenting with this style after reading the first article in a four-part series that highlighted the attractions, drawbacks, and benefits of tarp camping, including its reduced weight and the simple joy of tarp work that turns a sheet into a home. For someone with my experience, each trip becomes a case study in the fine detail of adjusting tarps on the fly, and I have come to respect how these minimalist shelters encourage community: the shared wisdom of how to stay dry under a flap, the camaraderie as we admire each other’s rigs, and the quiet satisfaction when our tarp camping efforts stand firm against the weather.
Practical Shelter Setup and Why It Still Matters
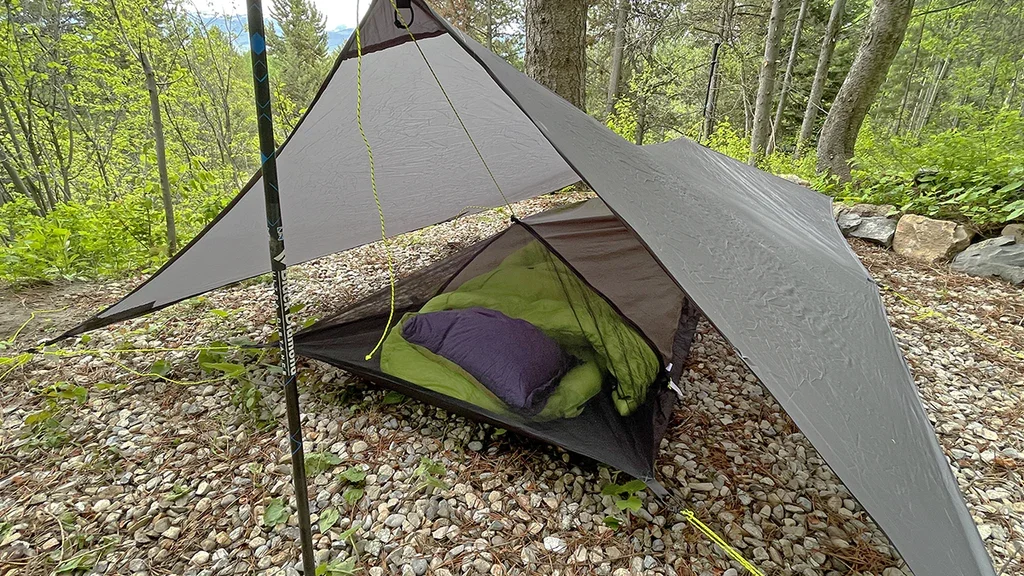
Over the years, I’ve learned that tarping camping is about thinking simply but smartly. As a camper who values freedom and flexibility, I find the minimalist nature of a tarp setup hard to beat. You use a tarpaulin to create a quick shelter, one that can shield your body and equipment from the elements like wind and rain. In one trip through the Karakoram foothills, I turned my hammock tarp roof into a solid awning, staying dry even through a downpour. What I love about camping traps is how durable, versatile, and waterproof they are. This kind of camping gear makes a difference in tough outdoor survival scenarios, especially for a hiker who needs gear that works, not just looks good.
There’s a lot of talk about how ultralight tents are changing the game, with some weighing just 900 grams, but the weight difference between a tarp and an ultralight tent still matters when you’re covering steep, wet terrain. For me and many avid outdoorsmen, tarps remain popular not just because they’re light, but because they’re adaptable. The construction process itself becomes part of the experience, giving you control over how you pitch depending on the terrain. And whether you’re stringing up a heavy rain fly above your tent or improvising with poles in a storm, there’s a significant advantage in knowing how to shape your cover with a tarp.
Why Tarp Camping Works So Well
After years of backpacking through remote wilderness routes, I’ve come to appreciate how tarp camping combines lightness, durability, and unmatched versatility. A lightweight trap is easier to carry than a traditional tent, helping enthusiasts like me minimize pack weight on long-distance hikes. Most ultralight backpackers are drawn to this method because a tarp can be rigged over uneven or confined spaces without trouble. I often use trekking poles and cordage as supports to form a shelter roof, especially when I expect rain fly coverage or plan to sleep in a hammock shelter. The simplicity of a square tarp as a tent accessory adds to its utility in the field. You can create a sled, stretcher, or even collect drinking water from condensation — the creative uses are endless.
In hot and humid climates, flat tarps feel more open, offering better ventilation than a sealed tent, which makes nights more enjoyable. I’ve also noticed how camping tarps, made from ripstop nylon, silicone nylon, or silnylon, resist punctures, tearing, and friction — key when you’re relying on a groundsheet for moisture resistance on your tent floor. Over time, I’ve used heavy-duty materials from trusted manufacturers and outdoor outfitters that promise long-term use. There’s also peace of mind knowing that with fewer zippers, clips, or parts to break, a tarp setup can be more reliable. As a minimalist outdoorsman, I find these shelters truly attractive, especially the open-sided feel that removes the barrier between you and nature. There’s nothing like sleeping under the stars, surrounded by your natural surroundings, knowing that you’ve got just enough above your head and not a gram more.
Challenges of Using a Tarp in the Wild
In my experience with tarp camping, the biggest drawbacks start with less protection against the elements. When a storm rolls in, you need to carefully pitch your tarp with the wind direction in mind. Unlike a tent, which offers a fully enclosed space, flat traps can flap and feel open, making them vulnerable to bugs, rain, and wind. Many tarp campers face the same trade-offs—choosing between less space or more weight when adding bug protection. A simple bug net, bivy sack, or sleeping pad means carrying extra accessories, which can increase pack weight. Learning to keep your tarp tensioned properly is a skill every true outdoorsman must develop, especially to avoid the endless flapping sounds in the night.
Also, there’s the reality of a lack of accessories and a lack of security when using a tarp tent. Though a tarp might weigh just one hundred grams per square meter, it often needs hiking poles, a strong setup, and more equipment to match a full camping tent. You might start with the lightest choice in theory, but quickly find yourself carrying a heavier load to stay comfortable. I’ve used A-frame tarp shelters that mimic tent configurations, but the open ends and no floor can let in critters, especially in places like bear country or where nocturnal predators roam. On wet trips, I’ve found that even the best weatherproof material doesn’t fully prevent ground moisture or deal with changing winds, freezing temperatures, or unpredictable rain. Despite loving camping tarps, in all weather conditions, a traditional tent with water-resistant walls may still be the better option than a waterproof camping tarp alone.
How Much Weight Can You Save
When I plan a long hike, my first concern is always weight. The big decision comes down to choosing between a tarp and a tent. I’ve compared setups many times, and if your setup includes accessory poles, groundsheet, and a bivvy bag, the savings can shrink fast. Take the Zpacks 8.5 x 10’ flat trap, which weighs just 200 g (7.1 oz). With 12 stakes + guylines (140 g / 5 oz) and the Zpacks flat groundsheet (DCF) (88 g / 3.1 oz), your total weight can hit 428 g / 15 oz. But if you swap the groundsheet for the Outdoor Research Helium Bivvy (448 g / 15.8 oz), it climbs to 788 g / 27.8 oz. Add carbon accessory poles (48”, 75 g / 2.6 oz each) and your kit only ends up about 50 grams shy of a full ultralight tent like the Big Agnes Tiger Wall UL2, which weighs 990 g / 2 lb 3 oz. In some cases, you’re carrying more just to stay under a tarp.
That said, tarp camping still works well when your pack already includes trekking poles or natural support, like trees. That way, you don’t add unnecessary bulk. I’ve often used the lightest tarps in areas where wind patterns are steady, and the pitching process is straightforward. But in regions with changing winds, freezing temperatures, or ground moisture, I’ve experienced the downside of limited weatherproofing. Even camping tarps with weatherproof material can’t always match the water-resistant design of an enclosed tent. While blocking wind and rain in consistent directions is possible with a good tarp shelter, in all weather, a traditional tent or even a waterproof camping tarp might be the better option for serious camping.
Staying Safe Around Wild Animals
A common concern I hear about camping is the idea of less protection from wild animals. But let’s be honest, even a tent won’t stop a determined bear if it wants in. Over the years, I’ve learned that it’s not about the shelter’s fabric, whether tarp or tent, but how well you protect yourself and your food. Smart precautions make all the difference. I always store food in boxes of bears or canisters and make sure they’re placed at a safe distance from my campsite. These steps are just as important whether you’re using a tarp or a tent.
When I’m exploring areas known for bears or scavengers, I never skip these habits. Even if I’m tucked under my tarp watching the stars, I know my setup is secure because I’ve done the prep. Keeping it clean, avoiding scented items, and staying out of spots frequently visited by animals reduces the chance of any unwelcome visitors. Whether in deep backcountry or a local forest, I’ve found the mindset and methods around camp safety matter more than the shape of your shelter.
Tarp Rigging Gear That Actually Works
When I started experimenting with different tarp configurations, I quickly realized that having the right gear is everything. Your kit should be versatile enough to handle changing weather, terrain, and the shape of your shelter. I’ve tested flat tarps, cat cut tarps, and even hexagonal tarps and heptagonal tarps, and each has its pros, cons, and rigging style. Flat tarps are the most popular, straight-sided, and square—ideal for hammock camping and setups like the traditional A-frame or even pitching to catch a view or block wind. Cat cut tarps are slightly more stable due to their curved edges and give a taut pitch with evenly tensioned fabric, reducing flapping—though you’re limited to two configurations. On the other hand, tarp manufacturers of hexagonal or heptagonal designs aim to offer a larger usable footprint, but you’re also accepting a limited number of configurations. I’ve written a detailed article on tarp choice, but this is the condensed version based on what’s worked best in the field.
To properly rig a tarp, you’ll need a mix of supports and guylines. For example, I carry both short pre-tied guylines and long tensioning guylines. The short ones—usually six pieces of 15 cm, made from 1.3 mm cord with short loops—are perfect for quick setups like an A-frame tarp pitched just off the ground. They save weight, reduce fat, and are part of my core kit. The long guylines—about 2 meters (6.5 ft), made with 2.3 mm cord—help with staking high points or securing a lean-to. I like using brightly coloured or reflective lines to avoid tripping hazards. You’ll also need at least a dozen Y stakes or V stakes, made from aluminium, steel, titanium, or even carbon shafts with metal tips, depending on the environment—sandy riverbanks, rocky ground, or hard ground.
Your supports might include trekking poles, a bicycle, or even a paddle. Trekking poles are especially handy because they offer no added weight to your pack, and the adjustable telescoping function lets you extend or shorten them to fine-tune the setup. For a bike-supported A-frame, use the front wheel as part of the support pitch, but add a single tarp pole at the entrance for ease of use. A paddle, surprisingly, can be self-supporting if you bury it deep enough into a riverbank, though I always carry a strap and cord to secure the paddle shaft. The core of any setup is your ridgeline. A cord like 550 paracord or 4mm accessory cord, at least seven meters long, is needed to span two trees. I use prusik loops, clips, and lightweight hardware like keychain carabiners, tied with a blood knot—not suitable for climbing, but perfect for tarp setups. My standard tarp rigging kit includes trekking poles x 2, Y or V stakes x 12, long tensioning guylines x 4, short pre-tied guylines x 6, and a 7m ridgeline cord with prusiks and clips. That’s everything you need to ring configurations confidently and adapt to any conditions on the trail.
Bivvy, Bug Shelter, or Groundsheet?
What you place between your ground and your sleeping bag can change your whole camping experience. Your choice often comes down to weather conditions and personal preference. I’ve used a bivvy bag many times in the Pacific Northwest, where the rain hits hard and splashes back under the edges of your tarp. It’s great for protecting your quilt and adds around five to ten degrees of warmth, which can be an upside or downside depending on the temps. Many bivvy bags also come with a built-in bug net window, offering solid protection from bugs without needing a full-size net. However, it weighs more than a groundsheet, so check your kit weights if going minimalist or lightweight.
If weight matters most, I often go for a groundsheet. Among the materials, DCF is very waterproof but expensive and hard to cut to size unless you find the right dimensions. Tyvek is more durable than polycro, which is the least durable but more waterproof. Tyvek can be crinkly and loud when new, though it gets softer and quieter after a warm cycle in the washer—just avoid the dryer. Aim for a groundsheet size that’s several inches longer and wider than your sleeping pad, but narrower than your tarp in an A-frame configuration, so it doesn’t extend beyond the tarp’s footprint and collect rain. In buggy areas with biting insects, I switch to a bug shelter, which feels less claustrophobic than a protective cocoon. These shelters have mesh walls, a bathtub floor, and an inner wall like a tarp tent, and they suspend neatly from your tarp. This addition usually weighs between 6 oz and 11 oz, but it means you’re not packing a separate groundsheet.
Tarp Rigging Fundamentals
Learning to tarp rigging takes a bit more know-how than what most tent campers ever need. There’s a downside—you’ll go through some trial and error, especially when working in difficult conditions like soft ground or hard ground. But the upside is that mastering the skills to rig tarps correctly earns real trail cred, and you’ll be able to adapt in places where freestanding tents simply don’t work. I’ve written an article with detailed instructions, but the basics are straightforward. You’ll need to understand a few techniques, including tying essential knots like the Larks Head, Bowline, and Trucker’s hitch. These are critical when hitching shorter pre-tied guylines to tie-outs, tying longer guylines to anchors, and tensioning your tarp for a tight setup.
The Lark’s Head is great for connecting loops on pre-tied guylines to your tarp’s tie-outs—just link, bend, and thread the loop, then tighten and neaten. A Bowline is what I learned as a scout, and it’s still my go-to knot for attaching a guyline from a tarp tie-out to a stake—check the Animated Knots demo if you’re unsure. For serious tensioning, use the Trucker’s hitch—it creates a 2:1 pulley to make your guyline extra taut. I often use this only on the secondary primary guyline when setting up an A-frame pitch. Don’t overlook your anchors; they must be sturdier than tents. Depending on the soil type, you might need a Y stake, V stake, peg, shepherd’s hook, sand stake, or snow stake. Set your angle at around 65° for the best strength and stability. When the ground’s too hard, rocks, roots, or other natural features, even boulders and bedrock, can make the sturdiest anchors. Just pick a suitable spot, position your pitch wisely, and if needed, strengthen weak spots by packing in other rocks that are large enough to hold steady.
Basic Configurations That Work
If you’re new to tarp-pitching, learning to rig a flat tarp in reliable configurations is a great way to build your backcountry repertoire. Two of the most useful setups are the A-frame and the Lean-to. The A-frame is a classic structure I often use when I need full protection from wind and rain. It’s quick to configure using either a tree-to-tree ridgeline or 2 trekking poles placed through tie-outs at either end. You can even swap a bike and an accessory pole when bikepacking. Its steeply pitched sides and simple complexity make it perfect for most conditions. I always carry 2 guylines, 8 stakes, and adjust headroom by lengthening the poles or pulling the corners off the ground to improve ventilation. I secure one guyline with a bowline and the other with a trucker’s hitch for solid tension.
The Lean-to is more basic, but equally useful in fair weather. It keeps the same height from end to end as the A-frame, but one side remains open, offering less protection from the elements and more air flow. If I’m near two trees, I fold the tarp over a ridgeline. Otherwise, I use 2 trekking poles connected to side tie-ins along the tarp’s length, plus 4 guylines and 7 stakes. When trees are available, I’ll swap 2 guylines for a ridgeline cord. The moderate complexity of this layout is worth it for the added space. To finish the pitch, I stake the tie-outs at right angles and secure the anchored stakes with a solid trucker’s hitch. It’s my go-to when I want to enjoy a view without feeling boxed in.
Choosing a Good Site for a Tarp
A good campsite selection is critical for every tarp camper. Unlike a tent camper, you don’t have bathtub floors, so you must learn to use natural windbreaks like trees and boulders to your advantage. Always position your tarp to avoid surface runoff, and in heavy rain, be prepared to dig a drainage ditch to divert water away from your sleeping area. Look for a flat, well-drained patch of ground and avoid low spots where water might collect. If runoff can’t be avoided, a shallow ditch can help—but better to steer clear of channels, depressions, or areas with darker sediments marking a rim. When pitching, always check for dead branches hanging in trees or bushes that could fall in light wind and injure you, especially if you’re into hammock camping, where body weight can shake loose weak limbs. Avoid dead trees and never set up under a potential widowmaker.
If you’re on slanted ground, try to sleep with your head uphill. Keeping your feet higher than your head can raise blood pressure and cause headaches. You’ll also naturally slide into your sleeping bag or quilt, not out of it. I always pitch my tarp with the wind in mind. Depending on conditions, I decide whether to stay exposed to catch a breeze (great for keeping mosquitoes and biting insects away) or stay protected in the lee of a windbreak like a large rock or thick bushes. Just watch out for local weather patterns such as katabatic winds, which can shift during the night and change everything.
Dealing with Rain
Staying dry and warm under a tarp takes more thought than tent camping, especially in challenging conditions. While light rain and mild wind are easy to manage, heavier weather demands careful planning. In my experience, one of the most effective measures is swapping a groundsheet for a bivvy bag. When rain hits the ground, it can cause splashback that wets your gear through the edges of the tarp. An ultralight bivy bag may not be fully waterproof, but it offers solid protection, insulation, and keeps insects out—key benefits when tarp camping in wet conditions. You can also pitch your tarp tighter to help avoid the splash, especially if the ground is soft or uneven.
Another trick I always use is to keep the tarp close to the ground by lowering the edges and using adjustable poles to match the right height. You’ll need to clear away small shrubs, roots, or rocks to do this properly. Whether I’m hiking in wet zones or anticipating storms, I’ll even dig a small furrow around my sleeping area. Shaped like a U, with the legs aimed downhill, it helps divert water and drain runoff from reaching my bivvy bag or groundsheet. Just make sure it’s dug a few inches under the tarp’s edge. I shared more on this in the first article of a four-part series—from choosing your first tarp, to tarp configurations, and hands-on tarp rigging techniques. If you’re into the fast and light mindset of human-powered exploration, these articles are made for you. I highly recommend reading all four before your next fastpacking trip.
Frequently Asked Questions (FAQs)
1. What’s the best way to stay dry under a tarp during rain?
To stay dry, pitch your tarp as close to the ground as possible, avoiding splashback by using adjustable poles and clearing out small shrubs, roots, or rocks. Also, using a bivvy bag instead of a groundsheet adds extra protection from wet conditions.
2. Is a bivvy bag or groundsheet better for tarp camping?
Both have benefits, but a bivvy bag offers better insulation, splash protection, and helps keep out insects. A groundsheet is lighter, but in challenging conditions with rain, a bivvy bag is the safer choice.
3. How do I prevent water from reaching my sleep area during heavy rain?
Dig a shallow furrow in a U shape around your sleep area, with the legs pointing downhill. This helps divert water and ensures proper drainage, preventing run-off from reaching your groundsheet or bivvy bag.
4. Can I use trekking poles with my tarp in wet weather?
Yes! Trekking poles are ideal for tarp setups. In the rain, you can shorten them to lower the profile of the tarp, minimizing exposure and improving runoff. Choose adjustable poles for better control over pitch height.
5. Where can I learn more about tarp camping techniques?
Check out the first article in the four-part series on tarp camping. It covers choosing your first tarp, tarp configurations, and rigging techniques. These articles are perfect for anyone into fastpacking and human-powered exploration.
Conclusion
Tarp camping is a skillful and rewarding way to experience the outdoors with minimal gear and maximum flexibility. From learning how to stay dry and warm in challenging conditions to mastering rigging techniques, site selection, and understanding the role of key items like bivvy bags, groundsheets, and trekking poles, it all comes down to preparation and practice. While it may take some trial and error, the payoff is a deeper connection to nature and the confidence that comes from knowing you can create a reliable shelter wherever your path leads.
Whether you’re drawn to a fast and light lifestyle or simply want to try something beyond traditional tent camping, tarping offers a lightweight, adaptable solution for human-powered exploration. Start simple, learn from every pitch, and let the rhythm of the trail guide your setup.
I’m still learning from you, while I’m trying to reach my goals. I definitely love reading all that is written on your blog.Keep the aarticles coming. I loved it!
Good day very cool site!! Man .. Excellent .. Superb .. I’ll bookmark your website and take the feeds additionally?KI am happy to find so many helpful information here in the publish, we’d like work out extra strategies on this regard, thank you for sharing. . . . . .
Hello my loved one! I wish to say that this post is amazing, great written and include almost all vital infos. I would like to see extra posts like this .